Wednesday, July 29, 2009

Kevin's lemon: Tasting

Cracked the 8oz test bottle on Kevin's Lemon tonight, even though its only been bottled for 8 days, it spent many days at ambient temp hi 70s/lo 80s, so I knew it would be adequately carbonated.

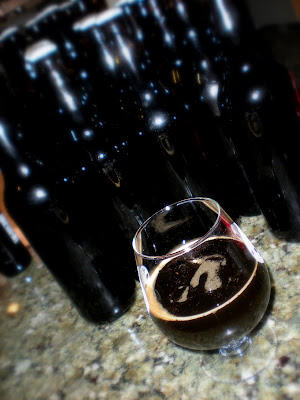
Which it was, probably just north of 3.0 volumes. 1/8th inch of yeast sediment (alot) apparent on the bottom of this test bottle. Cloudy and lemony golden color. A typical pour straight out of the fridge cold, produced a big fluffy head which stuck around, even though its only been in the bottle for such a short time. The yeast stayed put in the bottle, with a steady even pour. This beer looks pretty spot on for what I was going for.

Cool. I expect the head to build more structure, get tighter, denser with more time and conditioning.

Despite the low FG (presumed, still haven't measured it...sigh) and high carbonation, it still had a smoothness to it, likely from the flaked oats.

Just what I was going for. Its really fun when that happens...

Nice, full and satisfying, but still quenching and refreshing. Obvious spicey Belgian character in the nose, but when you sip, the flavor matches the nose to a tee. Given the big yeast-derived spice contribution and the restraint of quantity of actual spices used, you simply cannot pick out the origin of these flavors (a good thing).

Hops are MIA, barely there to balance any residual malt sweetness. I might up the IBUs about 8-10 next go around. Maybe a late Saaz addition to add another sublte aroma dimension.

But, maybe not...its pretty good as is.

I do hope it will continue to improve, and I hope Kevin will be pleased with this ale, borne from the inspiration of the lone lemon his tree produced.

Friday, July 24, 2009

Frozen Yeast Banking

After reading a thread on beeradvocate's homebrewing forum, I decided it was time to do a little reading on freezing aliquots of yeast slurry for long(er) term yeast storage. I would love to be able to buy any given yeast strain once, and then have a way to keep them stored, unharmed, in relative perpetuity, like Walt Disney's head, only with a slightly better chance of reanimation.

But, what were my other options?

Pitching on an existing yeast cake sounds great, but I haven't brewed sequential similar batches of increasing gravity (ie. APA-IPA-IIPA) and can't imagine being able to plan brewdays to line up properly.

Storing yeast slurry in mason jars in the fridge is ok, if you know you are going to use it in a month or so, but aside from maybe US05, I rarely will use the same yeast with such frequency. And Esther rolls her eyes when I have more than a couple samples in the fridge.

Everytime I dump the yeast down the drain, it just feels like such a waste.

So, freezing yeast slurry is, what appears to be my solution.

Being able to go to my yeast bank (clever name yet to be imagineered) and (eventually) pull from 15-20 different strains to make a starter without having to pay close to 10 bucks, and not have to either make a trip to the LHBS or wait for shipping, well, that's just a pretty attractive option for the homebrewer.

For freezing yeast, you really don't need much:
  • some plastic screw top tubes (a fellow Boston wort, thanks Byron, donated some 50ml sterile centrifuge tubes to my cause). Otherwise, you can find them in bulk (100 tubes/pack) for about a buck a tube, or in smaller quantities on ebay. You could certainly use smaller tubes, and if you don't get the sterile tubes, you can sanitize them before you put your yeast/glycerine solution in to them. If you choose to boil sanitize, make sure the tops can be boiled, some are made from a lower temp compliant HDPE than the tubes themselves. Screw tops are important to ensure a good seal.
  • 100% glycerin. This is the key to freezing yeast. It acts as a cryoprotectant, which means that it helps to prevent large ice crystals from puncturing the yeast cell walls. That's what would otherwise kill your slumbering yeast cells. With some internet shopping, and some trips to 3 local (massachusetts) pharmacies and the health food supplement section at whole foods, the best option I found was a double-16oz.bottle pack at amazon.com for ~16bucks, free shipping, no tax. tough to beat amazon, for price and convinience, once again. I understand that once opened, the glycerine doesn't 'go bad' either, so no worries about getting such a large quantity. If the link goes down, just search amazon for Now Foods Vegetable Glycerine. Found some glycerine at whole foods, but it was 10 bucks for 4ozs. uh... yeah.
  • Turkey baster
  • Santizer
  • Freezer
You want to make aliquots with ~15% glycerine 85% water/yeast slurry. A thick yeast slurry is preferable, more cells=better cell count upon reanination. I plan to still make a starter to ensure good health and descent cell count prior to pitching.

  • Save yeast slurry from a starter or from a primary, and wash the yeast, if desired. I didn't wash, which isn't ideal, but sometimes extra steps are just another chance to introduce contamination. At least that's what I tell myself sometimes. Store the slurry in the fridge. I can't quickly find the reference, but storing the yeast in chilling temps causes the yeast to build up trehalose in the cell wall, further increasing its ability to survive the freezing/thawing cycle.
  • Make a 50/50 solution of glycerine with water (glycerine is soluble in water), and microwave to boil to sanitize for a few minutes, cover with plastic wrap and cool in the fridge.
  • In order to make 15% glycerine solution, I'd need 7.5ml of glycerine in my 50ml tube (50 x .15 = 7.5), if I fill them. I don't plan to completely fill them, in order to leave some headspace to allow for expansion when freezing, but I'll still shoot for 15ml of the sanitized cryoprotectant solution. I made 1/4 cup + 1/4 cup, way more than what I needed for this small batch of tubes. Those 16oz bottles will last me a while, which is great.
  • Insert your santized turkey baster in to your yeast slurry, holding down on the bulb, then when you hit the top of the slurry, try to suck up the top most part (highest yeast cell concentration, if you didn't wash).
  • Store the mixed yeast slurry/glycerine in the fridge for a couple days, before freezing. Rationale here.
  • Ideally, you'd then store in a chest freezer vs. a regular home freezer to prevent damaging multiple freeze/thaw cycles, but I don't have one. I've read anecdotally that other homebrewers store their frozen yeast in the 'coldest' part of their freezer with very acceptable results, so I feel pretty good about trying this.
I'm making 5 aliquots of 3rd generation Wyeast 3944 for the start to the yeast bank.
I'll be sure to report back when I re-animate for the first time.


Stonginton Pale Ale: Dry Hopping!

Dumped 1.5 ozs each of Centennial, Cascade and Simcoe leaf hops on to the 10 gallons of Stonington Pale Ale last night. Hoping to punch up the American hops aroma with these additions.

Best man Jason was in attendance. Made an impromptu dinner of chili powder crushed pork tenderloin with lignonberry balsamic chutney (inspired by the rodenbach below), roasted small potatoes, and broccoli.

We were semi-celebrating his last standardized test for life and, as we commonly do when we get together, we cracked some beers that we've been meaning to sample together:
To cap off the night, we...uh...dry hopped:

Wood beer cases: Production update

My pop and Uncle Richard have been busy working on the cases on this rainy day.

5- 12oz bottle cases: done
4- 22oz bottle cases: done

750ml champagne cases: all wood cut, first box assembled in process, scheduled to be done next week


Wednesday, July 22, 2009

Wedding beer: Label Update (almost done...)

Kevin cranked out more work on the labels last night, bringing more continuity to the 'branding' between the three.

We are 99.9% of the way there, just a few minor tweaks, and I'll be able to send them off for printing.

Speaking of which, I've been getting quotes from sheetlabels.com, noting that I'll need for the ink and the labels themselves to be waterproof, as they'll be sitting in an ice bath prior to serving. I'll have to go with one of their standard sizes, as otherwise I'd incure a $275 one time set up fee (ouch).

But first, Kev and I will need to finish that last .1%, then upload the images to sheetlabels.com

...getting closer!


Wood beer cases: Production update

My pop and uncle kicked production of the wooden beer cases in to high gear yesterday.

They are slated to make:
5- Standard beer case size: 24-12oz (Stonington Pale Ale)
4- Bomber size: 12-22oz (pot & kettle)
4- Champagne size: 12-750ml (Bumble)

I decided that I was going to have to bite the bullet and bottle the Stonington Pale Ale in 12oz bottles vs. 22's. I just won't be able to get enough 22's to meet the 50+ bottle quota in time for the projected bottling timeline.

They've cranked out the 5 standard size cases, and have cut all the pieces for the bomber cases. Couple changes from the prototype:
1. They tweaked the dimension from the plans we found on the net (the inside of the box was too large)
2. They switched from screws to 'grip' nails (not sure what the correct term is, these nails have teeth that prevent them from sliding out).
3. They are using rough hewn wood vs. planed/sanded wood, for a less machined, more rustic/hand finished look. Plus, its less work for them, so it works out great for all of us.

Here are a couple pics of the stacked standard cases:

...and a couple shots of the first bomber case:

Tuesday, July 21, 2009

Kevin's lemon: Bottled

I always forget to take FG before I add the priming sugar. Today's bottling of Kevin's lemon was no different.
Then I always start out to rationalize my forgetfulness with the following internal monologue.

"That's OK, you can just take it from the sample bottle, or from a bottle you don't finish."
"You always say that, but never do"
"I will this time, I promise!"
"I don't believe you."
"I know, I don't believe me either."

The beer was 'very beery!' according to Esther, as I was bottling. She's right, its particularly spicy (both from the yeast and spices) and phenolic smelling. I'm looking forward to see how the mouthfeel of the oats plays against what I think was good attenuation. Bottled the 5.5 gallons with 7oz of cane sugar for a ~3.0volumes CO2.

I decided this would be a good time to try the Bruery's Orchard White, a lower abv version of what I was shooting for in this beer. Theirs: a spiced Belgian wit, brewed with oats and wheat, 5.8%abv. Poured a very thin looking and spritzy hazy witbier. Smells very spicy, soft and wheaty. Tastes...carbonated! prickly on the tongue, and apparently a very low FG, I would have expected more silky mouthfeel from the use of oats. This beer is VERY low. Almost as though they added bugs and dropped the FG to near nothing. To me, though, still a session beer, it could have used some remaining body, given the wheat and oats. Nope, nothing. And perhaps a bit too spiced (hard for me to discern between the added spices and contributed yeast flavors, which is nice, actually).

Huh, I'm sure some people will love this beer, but I'll look elsewhere when I want a nice summer spiced Belgian wit and I don't want to drop 9.50 on a 750ml.

Anyway, back to the post: Kevin's lemon. This one will hopefully have a bit more of that oaty silk in the mouth, be a little more subtley spiced. But, most of all, I hope it is something that Kevin will appreciate and enjoy.

Very much looking forward to raising a glass to my good friend Kevin.


Wood beer cases: Image transfer on to wood

A graphic designer and all around artistic friend of mine clued me in to the technique of transferring images from a laser print/photocopy with a 'blender marker'. Esther kept this in mind and picked up the Chartpak blender pen from Blick at the Landmark Center in the Fens.

The technique was very easy...
1. Print out the image (in reverse, VERY IMPORTANT, you'll see why...)
2. Use some easily removable tape to fix the printout in place
3. Use the blender marker to wet the area you wish to transfer. I noticed if you are heavy handed and use too much (three or four passes vs. one or two), the laser toner tends to run a bit, especially in the porous wood. this might be OK/preferable, if you are looking for a more rustic look.
4. Burnish the area with the back of spoon. You don't need to press too hard, just enough to ensure good contact with the dissolved toner and the wood.
5. Work in small area 'batches' ...the transfer will only work if the paper is wet with the marker's solvent.

Proof of concept achieved! ...I'll just be sure to print the images out flipped 180degrees next time. Oops.

The original idea was the trace the transferred image with a wood burning tool, and I still might do that, but this looks pretty darn good, and the results are achieved pretty quickly, too.


Sunday, July 19, 2009

Stonington Pale Ale

The last of the wedding beers...Stonington Pale Ale. Phew. Brewing 10 gallon batches in my kitchen is a challenge, and I was reminded how much easier a 5 gallon batch is when I brewed Kevin's lemon.

Its intended to be a crowd pleaser, a quaffable, but still characterful american pale ale. This ale is plainly named after the seaside town in which we'll be married.

This beer will have a relatively clean yeast profile, a touch of malt sweetness/richness from the crystal and Golden Promise english malt...but that'll be in the background, really looked to showcase the american hops (Zeus, Centennial, Cascade, Simcoe). Well, I guess this beer is halfway between an APA and an IPA...with ~50IBUs, hopefully it won't come across as 'unbalanced' ...y'know... beyond what Americans typically like in their hoppy beers.

Given that its a relatively light color (7.7SRM), I threw in the whirlfloc tabs with 10minutes left in the boil. I'm always impressed with the egg-drop soup like protein coagulation that happens from this stuff.


...~36 hours after pitching, the fermenting beer is like a lava-lamp of trub-y fascination


Hopefully this one ferments quick and clean on the cool side (~68F), and the timing will work out so I can use some homegrown hops to throw in to dry hop in about 5 days. Also planning to top crop harvest some of the chico strain to start up the frozen yeast bank.

More on that later...now, on to the recipe:


Type: All Grain
Date: 7/19/2009
Batch Size: 10.00 gal
Brewer: JC
Boil Size: 11.45 gal Asst Brewer:
Boil Time: 60 min Equipment: My Equipment
Ingredients
Amount Item Type % or IBU
21 lbs Pale Malt (2 Row) UK (3.0 SRM) Grain 84.00 %
3 lbs Cara-Pils/Dextrine (2.0 SRM) Grain 12.00 %
1 lbs Caramel/Crystal Malt - 40L (40.0 SRM) Grain 4.00 %
1.50 oz Zeus [16.40 %] (60 min) Hops 36.7 IBU
1.50 oz Centennial [9.00 %] (Dry Hop 14 days) Hops -
1.50 oz Cascade [7.20 %] (Dry Hop 14 days) Hops -
1.50 oz Simcoe [12.90 %] (Dry Hop 14 days) Hops -
1.00 oz Cascade [7.20 %] (20 min) Hops 6.5 IBU
1.00 oz Simcoe [12.90 %] (20 min) Hops 11.7 IBU
2.00 items Whirlfloc Tablet (Boil 15.0 min) Misc
2 Pkgs Fermentis American Ale (Fermentis #US-05) Yeast-Ale
Beer Profile
Est Original Gravity: 1.062 SG
Measured Original Gravity: SG
Est Final Gravity: 1.018 SG Measured Final Gravity: SG
Estimated Alcohol by Vol: 5.77 % Actual Alcohol by Vol: %
Bitterness: 54.8 IBU Calories: 271 cal/pint
Est Color: 7.7 SRM Color:

Sunday, July 12, 2009

pot&kettle oatmeal stout, tasting

Poured the sample bottle of pot&kettle tonight, just as I finished up capping the 2nd 5 gallons of it.

So, yeah, I had to bottle the 1st half, in order to get it out of the non-airlocked fermentor, and put the 2nd half in to a 5 gallon carboy, while I wrangled up enough 22 oz bottles (a total of 54) without any paint (ala stone or rogue) to finish the job. Thanks to Brendan, Kevin, Jason, Esther, Renee and Javi for their efforts. Difficult work, indeed.

I'm happy to report excellent success on the 2nd of the wedding beers as well. Though still a bit 'green', this beer is already quite enjoyable in its roasty smoothness that defines the oatmeal stout style. Pulled the 6oz bottle from the fridge and set on the counter to come up from the chilly temps. Adequate but not prickly carbonation. Pours what appears to be a viscous deep black color, darkest of ruby highlights toward the edges with minimal head (for now...more will develop with time *hope, hope*). Dark french roast coffee and almost a silky, smoky taste and moutfeel is deeply satisfying, even if it is mid-July. Reminisce of a great espresso, with just a bit of turbinado sugar to cut the acid and acridity. The finish is actually pretty clean, and good attenuation was clearly achieved by the Nottingham yeast.

I'm glad we've got another month-plus to go to let this one mature a bit more, to continue to develop and round out any remaining rough edges.

Now, for the glamour shots (click on 'em):


Hops-July 11th update

More hops pictures from yesterday (11July2009).

I couldn't resist it anymore, so I picked what looked like an almost mature cone, the yellow lupulin glands were evident. I picked out a few of the older flower bracts at the top of the cone and crushed it between my fingers. A beautifully rich and pungent, yet still green smell emerged. Can harldy wait til my first harvest.

On to the pictures...


Saturday, July 11, 2009

Beer cases

Earlier this week, my pop and Uncle Rich put together the prototype of a wooden beer case. The idea is to have family-made, handcrafted cases to really add another great level/complete the presentation of the wedding beers.

The wood to be used for these cases are made from wide solid white pine planks, milled from trees that were cut down on Rich's property. I do hope we can display these in such a way to proudly show their much-appreciated contribution. This is really what our day is all about for us... a generous and thoughtful addition, that, taken together, makes the day that much more uniquely about us and the people that we love. Things like this mean so much to the both of us. A 'detail' that can't be bought in a store, things that people rarely have the time or energy for in these yeah, we have 927 channels, but still nothin' good on TV days.

The cases are made from 3/4 inch solid white pine, and has a recessed bottom and four corner brackets that will allow the cases to be very securely stacked. Hand sized holes have been cut and smoothly sanded into the sides, and we plan to finish these with a burned-in (soon to be finished) logo and a good rub down with tung oil, to preserve and protect the wood, but also to highlight the natural beauty by adding richness and depth. Over time, a light patina will develop, somewhat like the old Brooklyn Edelbrew breweriana beer case from my Pepere that's occupied my living room for the past 8+ years.

Anyway, I proudly leave you with my pop (on the right) and my uncle, at the Sticks and Stones workshop.

Thursday, July 9, 2009

pot&kettle, flip the script

hmmm, maybe i can flip the script on the pot&kettle label, play up the ultra darkness (56.9SRM) of the beer...I like it. alot.

Tuesday, July 7, 2009

Wedding beer: Label Update

Spent more time with Kevin, working on refining the beer label concepts for the wedding.

We are getting pretty close on these, I think...but, please send me your constructive feedback, its much appreciated.


to-be-brewed stonington pale ale

Related Posts with Thumbnails